Dehumidifier cleaning and drainage guide: filters, tanks and hoses
A dehumidifier needs clear airflow, a clean filter, controlled water handling and a drainage route that cannot leak or block. This guide separates safe owner maintenance from faults that need competent service.
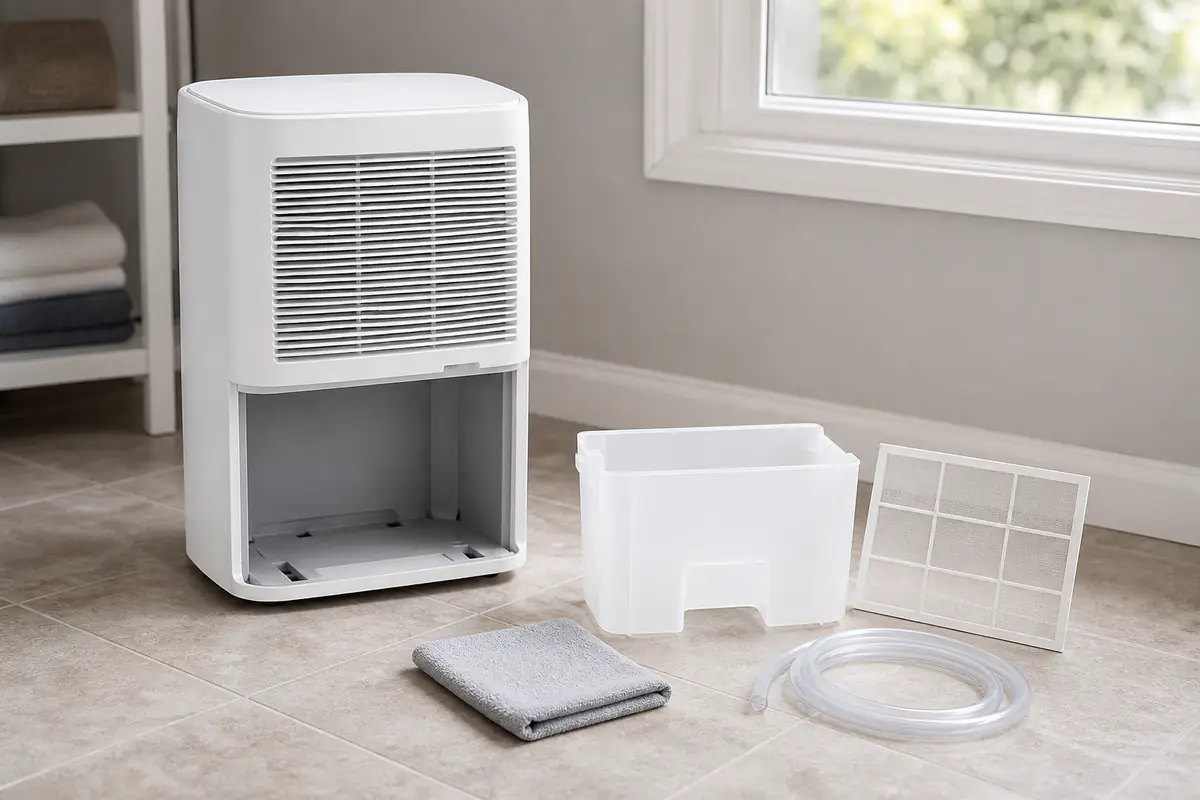
In this guide
Disconnect before maintenance and keep water away from electrical parts
Follow the exact manual, clean the user-serviceable filter and tank on schedule, inspect hoses and stop at heat, smell, leakage or electrical damage. Do not dismantle a sealed refrigeration circuit or improvise drainage beyond the maker’s instructions.
Use the dehumidifier buying guide for selection, the value guide for cost and the capacity guide for room sizing. This page is about cleaning, drainage and storage after purchase.
| Symptom or task | First safe action | Evidence to keep | Stop and escalate when |
|---|---|---|---|
| Reduced airflow | Switch off, unplug and inspect user filter and clearance | Filter state, room and setting | Heat, burning smell or damaged fan |
| Tank fills or leaks | Stop, empty, inspect seating and float as manual allows | Leak location and tank condition | Water reaches plug, cable or internal electrics |
| Continuous drain fails | Stop and inspect supported hose route and blockage | Hose size, slope, outlet and error | Pump or internal connection needs opening |
| Frost or poor extraction | Check room temperature, airflow and manual | Temperature, humidity and cycle | Ice persists or abnormal noise develops |
Safe dehumidifier maintenance sequence
- Read the exact model manual before opening a user panel.
- Switch off and unplug before cleaning or moving.
- Empty the tank and keep water away from electrics.
- Clean or replace the filter only as instructed.
- Clear inlet and outlet without inserting tools.
- Inspect tank, float, hose and outlet route.
- Let washable parts dry fully before refitting.
- Stop at heat, smell, arcing, damage, repeated leaks or abnormal noise.
Identify the exact model and drainage system
Record model, serial number, purchase evidence and official manual. Dehumidifiers differ: some use a removable tank, some allow gravity drainage, some have a pump and some use modes that change fan or defrost behaviour. A generic video can show a similar-looking machine while giving unsafe access or hose instructions for the wrong design.
Photograph the normal assembled state before removing any user-serviceable part. Mark which filter, tank, float, cap and hose connection the manual identifies. Do not open the cabinet or refrigeration circuit; this guide covers only owner maintenance explicitly described by the manufacturer.
Create a safe maintenance area
Switch off, unplug and allow the fan or compressor to stop. Empty the tank before lifting. Work on a dry, level floor with enough light and space to set parts down. Keep the plug and cable away from wet cloths, sinks and open containers. Wear suitable hand protection where the manual recommends it.
Do not tip the appliance casually. Refrigerant-system products may require an upright settling period after transport; follow the exact manual before restarting. If water reaches the plug, socket, cable entry or internal electrical area, do not reconnect it. Seek competent advice after making the area safe.
Keep inlet and outlet airflow clear
Dust and fabric lint can restrict air through grilles and filters, reducing extraction and increasing operating stress. With the unit disconnected, remove loose surface dust using the method allowed by the manual. Do not push tools, cotton buds or vacuum nozzles through a grille where they can contact the fan or internal components.
Place the appliance with the maker’s required clearance from walls, curtains and furniture. A clean filter cannot compensate for a blocked outlet. The laundry-mode guide explains safe room setup for drying clothes without draping items over the machine or obstructing airflow.
Clean or replace the filter correctly
Remove only the user-accessible filter after unplugging. Check whether it is washable, vacuum-only or replaceable, and follow the specified interval and method. If washable, use only permitted water or cleaner and let it dry fully in the way instructed before refitting. A damp filter can introduce odour and restrict airflow.
Inspect for tears, deformation, crumbling foam or a frame that no longer seals. Use an exact compatible replacement rather than cutting unknown material to fit. Record the cleaning or replacement date. A dramatic drop in performance after service can indicate incorrect seating, remaining dampness or another fault rather than proof that the filter needed more aggressive cleaning.
Empty and clean the tank without flooding the unit
Remove the tank smoothly and support its weight. Empty it into a suitable drain, then clean it at the interval and with the method in the manual. Avoid abrasive tools that scratch surfaces and make residue harder to remove. Rinse only where allowed and dry the outside before returning it near the appliance.
Inspect the tank for cracks, distortion, damaged handles and a blocked or misaligned float mechanism. Do not force the float or defeat the full-tank switch. If the tank repeatedly fails to seat, compare its rails and orientation with the manual and stop before trimming plastic or applying lubricant that the maker has not approved.
Investigate a tank leak methodically
Stop the machine and unplug it. Dry the external area, then identify whether water came from an overfilled tank, poor seating, a cracked container, condensation on a cold surface, a loose drain cap or a hose connection. Photograph the location before changing parts. Refill tests should use only the safe procedure in the manual.
A towel placed permanently under the appliance hides rather than fixes a leak and may keep water near electrics. If the source is internal, repeated or close to electrical components, stop using the unit. Use the faulty-goods guide to preserve evidence and contact the seller or manufacturer.
Set gravity drainage with continuous fall
Use the hose type, internal diameter and connection specified for the model. Route it continuously downhill to a suitable drain without kinks, loops that trap air or a submerged outlet. Secure it against being kicked or pulled. Test the full route while present and able to stop the machine.
Gravity cannot lift water to a higher sink or window. Do not extend the hose beyond the maker’s limit or join mismatched fittings that can leak. Check that the drain can accept the flow and will not back up. Record the route with a photograph so later furniture or appliance movement does not silently change the slope.
Maintain a pumped drainage system only as instructed
A built-in pump can move water differently from gravity drainage but introduces its own reservoir, hose limits, cleaning and fault codes. Follow the exact pump instructions and keep the outlet secure. Do not assume the pump makes any height or distance acceptable; use the published maximums.
If the pump runs repeatedly without moving water, makes an abnormal noise or reports a persistent fault, stop and check only user-serviceable items. Do not open the cabinet or bypass a sensor. A separate condensate pump also needs its own rating, overflow protection and maintenance; seek competent installation where leakage could damage property.
Check hose and drain hygiene
At the manual’s interval, disconnect power, remove the hose using the approved steps and inspect for kinks, deposits, algae-like residue, damage and loose seals. Clean or replace using maker-approved methods. Let parts drain and dry before reconnection. Never use a chemical mixture simply because it clears a household sink.
Keep the outlet visible where practical and prevent it touching dirty standing water. A drain route can become blocked by a moved hose, full trap or household debris. Test after any change and inspect the first operating period. Continuous drainage should reduce tank emptying, not eliminate routine checks.
Understand frost and defrost behaviour
Refrigerant dehumidifiers can form frost in cool conditions and may pause extraction to defrost. Check the model’s operating temperature range and indicators. Do not scrape ice with a tool, pour hot water into the machine or direct a heater at it. Improve room conditions and airflow only within safe instructions.
Persistent heavy ice, repeated short cycling or abnormal noise can indicate a sensor, airflow, fan or refrigerant-system issue. Record room temperature, humidity, setting and cycle timing, then seek support. A desiccant model behaves differently, so do not transfer troubleshooting steps between technologies.
Use humidity readings as trends, not laboratory truth
A built-in sensor reads air near the appliance and can differ from a separate meter elsewhere in the room. Place an independent meter away from direct outlet air, windows and radiators and compare trends over time. Do not chase rapid one-point changes by running the unit continuously.
Door openings, temperature, cooking, showers, laundry and outdoor weather all affect readings. Our appliance running-cost guide helps record hours and energy without inventing savings. The purpose is a controlled moisture plan, not the lowest possible number regardless of comfort and building conditions.
Clean the exterior without introducing liquid
With the unit unplugged, wipe the housing using the method and lightly dampened material permitted by the manual. Keep liquid away from controls, display, grilles, cable entry and seams. Apply cleaner to the cloth, not directly to the appliance, where the maker allows a product.
Do not use solvents, abrasives, steam cleaners or sprays that can damage plastic, coatings or insulation. Let the exterior dry before reconnecting. A stained or sticky control panel may need service rather than stronger chemical treatment if contamination has entered around buttons.
Inspect plug, cable, socket and operating behaviour
Before reconnecting, inspect the plug, cable and strain relief for cuts, flattening, looseness, burn marks or exposed conductors. Use a suitable wall socket and follow the manufacturer’s extension-lead guidance. Electrical Safety First advises stopping at heat, burning smell, buzzing, crackling or repeated tripping.
Do not repair a moulded plug, cable or internal component without competence. Switch off and unplug if the machine becomes unusually hot, smells, smokes or makes a new mechanical sound. Record the model and symptom and check current safety notices through official routes rather than relying on an undated forum answer.
Register the appliance and check safety information
Register the product with the manufacturer where available so safety updates can reach the owner, and keep the serial number with the purchase record. Check official recall and product-safety information if behaviour changes or the model history is uncertain. A working machine can still be affected by a corrective action.
Do not continue using a recalled product unless the official notice explicitly explains a safe interim step. Our review-reading guide is useful for separating user anecdotes from official model-specific action. A report of smoke in another model is not proof about yours, but it is a reason to verify identity carefully.
Prepare the unit for off-season storage
Follow the manual’s shut-down sequence, empty and clean the tank, service the filter and allow all permitted washable parts and internal collection areas to dry as instructed. Coil the cable loosely without tight bends. Store upright in a dry protected location away from frost, heat, pests and impact.
Do not seal a damp unit in plastic or store it where children can climb on it. Keep the hose, cap and manual together in a labelled bag without blocking ventilation needed during drying. Before the next season, repeat the plug, filter, tank, hose and recall checks before the first unattended period.
Know when maintenance must stop
Owner maintenance ends at sealed panels, refrigerant components, internal pumps not designated for access, electrical repairs, damaged insulation, repeated internal leakage and faults that persist after permitted checks. Unplug and seek the manufacturer, seller or a competent repairer. Do not bypass a full-tank switch, thermal protection or error code.
Use the energy-efficient appliance guide when deciding repair versus replacement, but prioritise safety and support. A newer low-energy claim does not justify premature disposal of a safe repairable unit, while sunk cost does not justify operating a damaged or recalled appliance.
Continue owner maintenance or seek service?
The task is explicitly user-serviceable
The unit is disconnected and the manual covers the filter, tank, exterior or supported hose route without internal access.
Electrical, refrigerant, pump or repeated leak risk appears
Heat, smell, arcing, damage, abnormal noise, internal water or a persistent error needs competent assessment.
Balanced verdict
Good dehumidifier maintenance protects airflow and water control without opening the machine. Use the exact manual, disconnect before cleaning, keep parts dry and treat drainage as a route that must be inspected, not forgotten.
Use the linked buying, sizing, laundry and running-cost guides for questions outside owner maintenance.
Official checks:
Electrical Safety First dehumidifier advice ↗
UK product safety alerts, reports and recalls ↗
Register My Appliance ↗
Frequently asked questions
How often should a dehumidifier filter be cleaned?
Follow the exact model manual and the room’s dust conditions. Record the interval and clean or replace only by the method the maker specifies.
Can a dehumidifier drain into a higher sink?
Gravity drainage needs a continuous supported fall. Only a model-approved pump route can lift water, and its height and hose limits still apply.
Should I run a dehumidifier with ice on the coil?
Do not scrape or heat it. Check operating temperature and defrost instructions; persistent heavy icing or abnormal cycling needs support.
Is a towel under a leaking dehumidifier acceptable?
No — Stop, unplug and identify the source. A towel can hide continuing leakage and keep water near electrical parts.
Can I open the case to clean inside?
Only access parts the exact manual identifies as user-serviceable. Sealed electrical and refrigeration areas need competent service.
Methodology and limitations
We reviewed current Electrical Safety First dehumidifier maintenance advice and UK official product-safety routes on 2 September 2026. We structured checks around disconnection, airflow, user filters, tanks, gravity and pumped drainage, frost, electrical warning signs and storage. We did not dismantle, electrically test or performance-test an appliance.
Limitations
Designs and instructions vary, and water or electrical faults can be hazardous. Follow the exact manufacturer manual and safety notice. Seek competent service for internal access, electrical damage, refrigerant work, persistent leaks or abnormal heat and noise.